
Indian Mud Run
Indian Mud Run
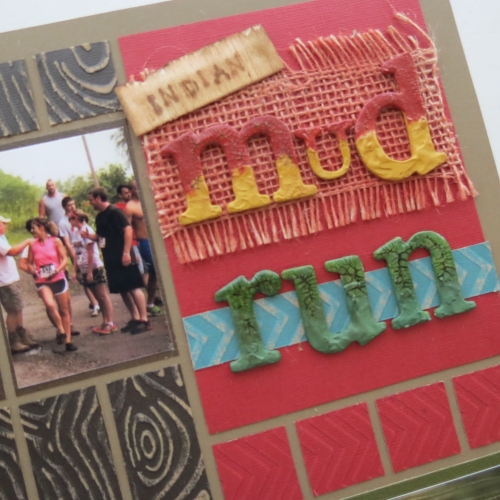
The final challenge for this year’s Design Team was TEXTURE. We were to create a custom texture to use on our pages and show the process. We also were to use one or more of the following items: paint, beads and burlap.
This June, my oldest and youngest sons participated for the second year in a row, in a 5k Mud Run. The obstacle course ran through a park in Coshocton, Ohio, along the Ohio and Erie Canal. As the boys arrived in town the eldest told the youngest that seeing as he now had his driving temps, that if he, the elder, broke his leg, the younger could now drive them home. In our house, that’s what’s known as “famous last words”, and yes, the younger drove home and yes, the elder had a broken ankle…in four places…surgery, plates and numerous screws would follow in the days ahead…but the story of the younger and his quest to conquer the mud, is the story I’m sharing today.
The photos were taken by professional photographer, J & S Photography & Design of Coshocton. The photos were purchased and have not been altered and only one has been trimmed to focus on the lineup of runners that both sons are featured (on the far right red shirt and grey shirt.) The single photo post event of Andrew is my own. In a field of over 570 participants, to have several photos of just one of them is really great. I just had to do this layout, so I broke down and spent the money on the photos. I don’t think I’ll ever regret it!
The base grid that I began with is a 12x12 Sage Mosaic Moments Grid, one of our newer colors. It is wonderful for any earthy out of doors activities, like hiking and camping!!
PAGE ONE
The outdoors event was so perfect for the theme of texture. “Mud Run” screamed for some lumps and slime and I tried my best to get them. The custom texture I came up with was using an Imagine Crafts product I purchased on clearance called “Matte Goosebumps texture spray” and it is really easy to work with on a variety of surfaces. I tried a few ahead of time and then began on a textured Tim Holtz Kraft-core paper, but I found that I did not get the surface for inking that I wanted and switched to a regular smooth texture cardstock. The spray puddles and spits and you can control a great deal of the results. Drying time will depend on how heavy it has been applied. Once dried I used distress inks to rub into the spots between the Goosebumps. I wanted a muddy lumpy look to go next to the photo of crawling under the barbed wire photo. The inks give it quite the camouflage feel.
I have also included all three element options. The first being paint on the chipboard letters, on the burlap (the second element used) and the pennants in the banner on the bottom where I have also posted some of the event obstacles.
On the chip board I used an acrylic paint as a primer. Then using Dreamworks Embossing Paste I mixed a little of the acrylic paints into the paste then applied with a palette knife and ‘sculpted’ the bottom half of each letter with the paste. It takes time to dry and set up.
On the top half of the chipboard letters I covered them with a thick layer of Tim Holtz Distress Crackle Paint: clear rock candy. That too, takes some time to dry, harden and crackle.
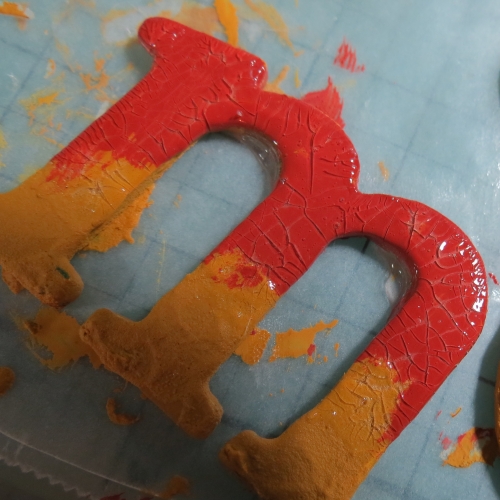
Once ready I used Distress Inks to rub into the cracks to really show off the effect. Wipe the top off when you are finished to remove unwanted ink, you really only want it in the cracks for this technique.
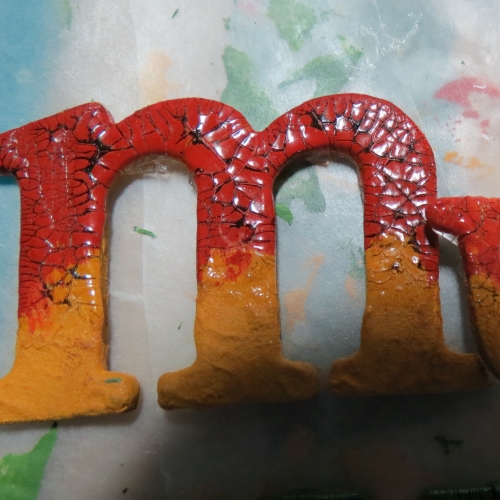
I used Aleene’s Glue to adhere to the burlap and cardstock.
I also painted the burlap for this challenge. For the title block I used American Crafts Mr. Huey “Lucille” and for the burlap on page two it is October Afternoon’s Farm House Wheat Field. The banner flags were also painted in these colors and along with October Afternoon’s Woodland Park Springs.
PAGE TWO
I have matted each of the photos (using several shades of cardstock from Tim Holtz Kraft-Core Nostalgic Collection,) so they would easily fit in the page format and allow the wider border to be used to add a little interest and the third element, beads. There are several spots on the course where knotted ropes are used to help them climb. So including some hemp cording knotted with beads was my tip of the hat to that course element. I’ve used the knots to position the beads and hold them in place. Each frame has a different pattern. On page one with the barbed wire photo I used a camo variegated bamboo cording to knot several strands without the beads.
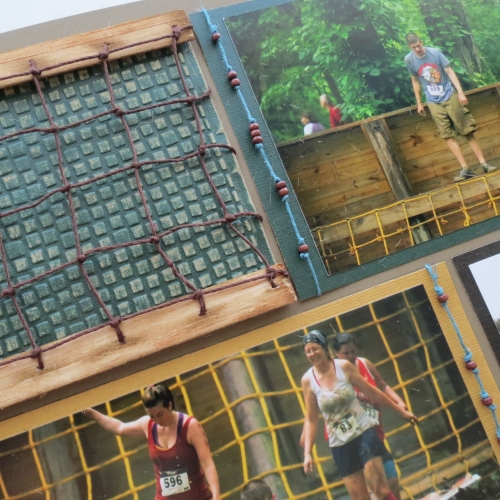
Additional textures included on this layout were the faux wood burned signs. I used walnut ink to stamp the letters into the balsa wood and other distress inks to age the wood and add to the wood burned look.
I have used another chipboard letter “k” and glued Kraft-Core cardstock to it. Once dried, (we waited a lot on things drying in this challenge!) I trimmed with an X-Acto knife and scissors. Sanding the edges and a bit on the top to expose the Kraft Core and then finished off by inking the edges. To get into the tight spots I used a Q-tip.
Embossed papers, knotted bamboo cording, chipboard layer, painted banner with wrapped cord and goosebumps textured and inked surface.
For the ends of all the banners to curl a tiny bit of glue run the length of the cord then wrapped around the center of the Q-tip till it dries. Cut the swab ends off to keep from adding cotton to the cord. Trim the cord if you have a lot of excess.
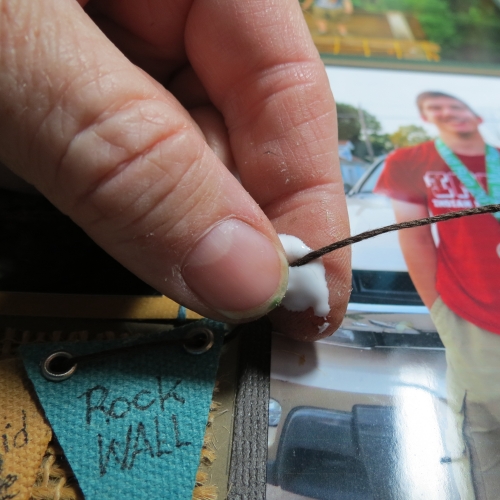
Some of the cardstock has been run through an embossing folder and sanded to reveal more of the Kraft core.
A final piece of texture was a block on page two that has recreated the cargo nets from the race. For this block I used my Mosaic Moments grid mat to line up the cord. I’ve taped the upright sections to the mat and worked from right to left weaving and knotting at the 1” intervals until I had enough to cover a 4x4 block.
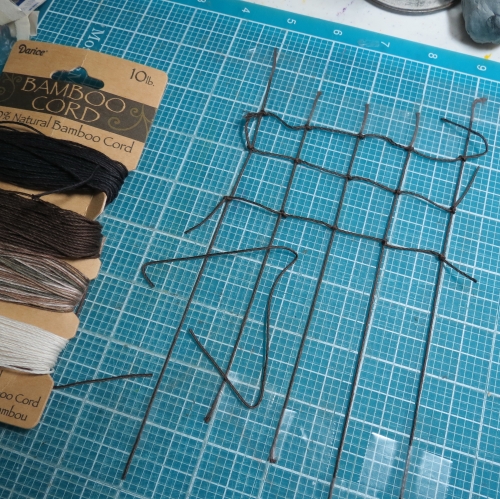
Then, two narrow ½” strips of balsa wood were prepared with distress inks and pierced at the appropriate spots to feed the cording through and secured on the back with a glue dot. To secure to the embossed cardstock block, a strip of ½” in. foam mounting tape, trimmed to half the width, is placed at top and bottom and then attached. Once secure the individual strands are adjusted vertically until snugly in place then secured like the bottom section.
The pennant banner has a few of the events in the race printed using a Micron pen. It’s permanent and does not run. Each of the pennants is secured to the burlap with a pop dot as it adheres well to the burlap and gives a little floating in the air look and feel to the banner.
Well, I want to thank everyone who has been stopping by Journella to see what the Design Team is working on. Some of you have been regular visitors and commenters from the start and we’ve loved your participation! Thanks for being a part of the journey! You will see some of my work continue to show up on the new website www.mosaicmoments.com under the tips & technique section, as well as on my blog spot. I hope you will share your layouts here on Journella, you meet the nicest people here!!
andrea
#IndianMudRun


